If you’re anything like me, you’ve been straightening your hair most of your life because, well, you just didn’t know what else to do. Your hair type is something 2abc. Not straight but not curly. Well, I’m here to show you another way. Quite frankly, this is the only wavy hair routine you’ll ever need.
Let’s get to it!
This post contains affiliate links and we may earn if you click on them (at no extra cost to you). Please read our full disclosure policy here.
What Exactly Is Wavy Hair
Wavy hair is not quite straight and not quite curly. That’s the easy answer. But it’s not that simple is it?
I bet your hair has changed over the course of the years. Some days your hair feels a bit limp and dull, other days you have a lot of volume.
Most of us have not been taught how to ‘work’ our wavy hair and we certainly haven’t been given a routine.
It’s almost as if waves = unruly or unkept hair. Either straighten it or style it.
This lack of understanding for the wavy 2a, 2b, and 2c hair types means that most of us have probably mistreated our hair throughout the years, applying heat and product that we didn’t really need.
Imagine if you had a 30-minute easy wavy hair routine that would not only restore health back into your hair but could give you those flowing locks you always wanted?
Well, that’s exactly what I got for you. If you can follow through with this routine, you’ll never need straighteners again!
Firstly, let’s take a look at the curl type system so you can understand your exact hair type.
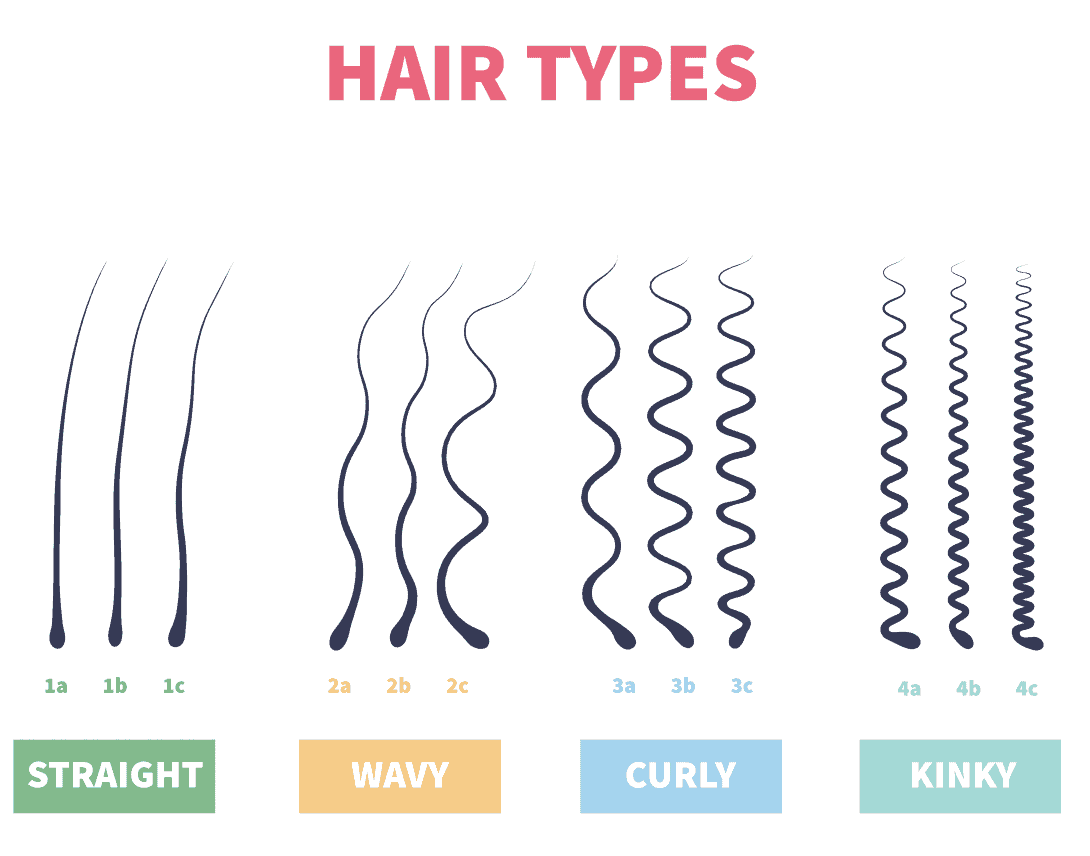
When people talk about curl patterns, they generally refer to the Andre Walker system as pictured above. As you can see, a 2abc hair type is a wavy pattern that doesn’t quite turn into a curl.
Knowing your curl pattern is good for setting the expectation of how you might be able to style your wavy hair and what routine to use, but when it comes to choosing products, it doesn’t really matter that much.
For products, it’s better to focus on hair porosity, but more on that later.
And just to note, there are a lot of terminologies involved with the CG Method, so if you need to brush up on your terms, I wrote a Curly Girl Method glossary that should help!
My Journey From Straight To Wavy To Curly
I’m mixed Caucasian and Asian. If that is not the recipe for straight hair, I don’t know what is.
When I was 12 I was a huge Spice Girls fan and for some reason, my mother agreed to let me perm my hair so I could look like Mel B. I don’t know what got into me, and quite frankly I don’t know what got into her.

If you’re laughing out loud, I won’t blame you.
But since then, my hair’s never really been the same. I can tell from old photos that as a child, my hair was glossy, straight and it looked incredibly healthy.
As I grew older, I began reaching for the straightening iron as I was experiencing an awful lot of frizz.

It probably also doesn’t help that I don’t like going to the hairdressers. I have long hair and I want to keep it long. So, I cut it myself. The results is never amazing, but it’s never been awful.
Except for those few times when I’ve tried to bleach it as well as cutting bangs. Note to self: Neither look good on me.
It wasn’t until I reached my early thirties that I finally found a wavy hair routine that worked for me.

And yes, as you may have guessed, it was the Curly Girl method.
The Curly Girl Method For Wavy Hair
Contrary to belief, the Curly Girl Method doesn’t just work for curlies. If I could convince anyone to follow the method, I would.
In fact, I even wrote a guide on how to follow the CG method for straight hair – that’s how much I believe in it.
At the very least, I believe a modified version of the method can help anyone achieve healthier hair. It really doesn’t have to be a regimented 2-hour version which I see far too many newbies try to follow.
I was guilty of that myself and it really honestly did nothing good for me. It took away precious hours of my day that I could have spent doing other things.
What I found, after about 12 months of following the method, is that you only really need 30 minutes for a solid wavy hair routine. That’s all it takes to drastically improve your wavy hair’s natural health.
What Is The Curly Method
The Curly Girl Method was invented by Lorraine Massey, the author of Curly Girl The Handbook. Massey used to work with Deva Curl but parted ways with the company a while back.
She now owns Curly World and has her own product line.
The Curly Girl Method essentially encourages you to ditch harmful ingredients such as sulfate, silicone and drying alcohols from your hair routine.
Recently, Massey has included parabens to this list, but this is to do with general health concerns regarding parabens.
Some CG followers still use paraben products and it’s entirely a personal choice.
The CG Method also dictates that you stop using heat styling tools such as straighteners, curling irons as well as blow-dryers on high heat.
Even regular towels are a no-go as they can cause friction. Brushing should only be done with a wide-tooth comb on wet hair.
So there are a few rules, yes, but once you get the hang of it, it’s super easy.
The hardest thing for any new to the Curly Girl Method is to find the right CG friendly products and how to nail a routine. But don’t worry, I’ll help you with that.
Bye Bye Shampoo
The biggest change you may have to undertake is to stop using shampoo. Yes, that’s right. The Curly Girl Method is a no-poo method, which means you only wash your hair using botanical cleansers or CG approved conditioners.
It may sound crazy, but you actually don’t need shampoo to clean your hair. That lather you experience from shampoo? The bubbles and the deep clean feel? That’s sulfate, a harsh cleansing agent.
Sure, sulfate cleans but it also strips your hair of it’s natural oils and if there’s one thing wavy and curly hair needs? It’s moisture.
Actually, the whole shampoo/conditioner routine is kind of a big lie. Why? Because once you’ve stripped your hair of it’s natural oils, you need to soften your hair again.
That’s why we use conditioner. Most conditioners contain silicone and silicone actually forms a protective layer around each hair strand.
It absolutely softens your hair’s appearance, but it also prevents moisture from entering, thus you end up with dry, brittle hair.
Sound familiar?
And guess what. In order to remove silicone from your hair? That’s right. You need sulfate.
But imagine if you could change all that. Imagine how much softer your waves would be? Imagine, if your hair was left to do it’s own thing, what could it do?
Let me show you.
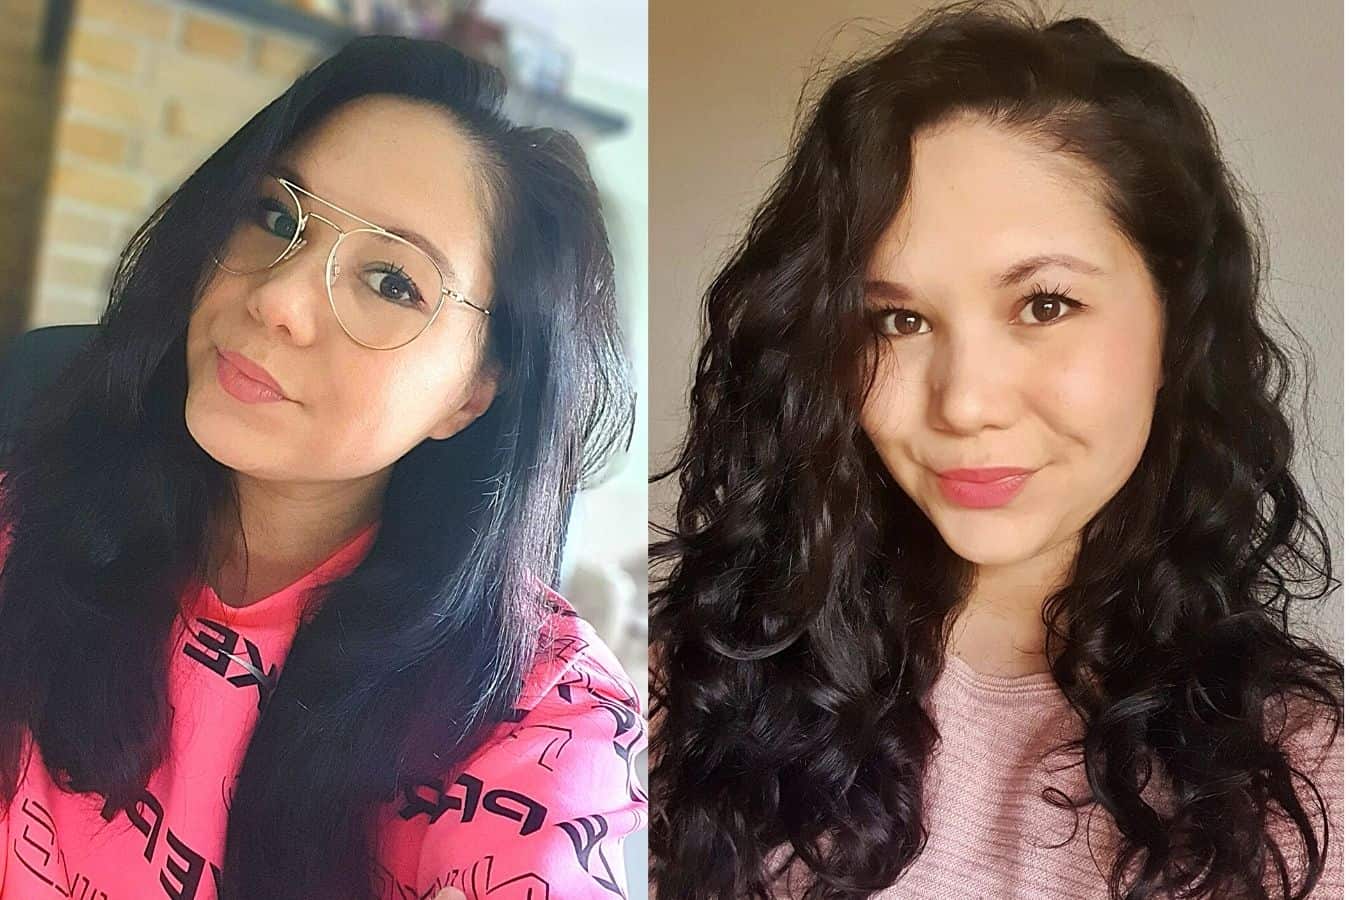
This was me before the CG method:

And this was me when I was really regimented about the CG Method (not recommended):

And here I am now, spending 30 minutes max on my hair routine

My hair has literally transformed. It’s no longer lifeless, thin and dull. I’m seeing waves and curls I never even realized I had.
Also Read: Why You Don’t Need a Final Wash: The Curly Girl Method
Why The CGM Wavy Hair Routine Works
As you can tell, the CGM method works very well for me. It’s taken a bit of time I’ll admit, but my hair now feels better than it ever has.
And here’s a secret, I don’t even follow the method every day. Heck, I even blow-dry on high heat some days. I blow-dry it straight too!
I have changed the CG method to fit my own wavy hair routine and my hair has never felt as soft and healthy as it does now.
And here’s why:
No Straightening
I haven’t straightened my hair for almost two years and it shows. I used to have very frizzy hair when left to air-dry.
Now I can air-dry my hair without using any products and dare I say that underneath the wavy bits, curls are beginning to form.
As much as people talk about the CG method as being a miracle method, I truly believe that not straightening my hair for such a long period of time is the main reason for its newfound health.
No Harsh Chemicals
This is another big one. Avoiding sulfate, silicone and drying alcohols has really restored by hair back to its former glory.
Now I’ll admit this wasn’t easy. There were days when I felt like the CG method was making my hair greasy and itchy and I’ve struggled a bit with product build-up on my scalp.
This was of course due to the dreaded transition phase, but it really does pass.
Looking back now, I wish I hadn’t been so regimented. I wish I had allowed myself to use shampoo, even once every 3-4 weeks. I was also using way too much gel and this obviously did nothing good for my scalp.
I now follow a modified version of the CG routine for wavy hair and incorporate shampoo once a month. I also do an apple cider vinegar rinse once every 6 weeks.
My hair feels better than ever before.
Gentler Wash And Drying Routine
I take care of my hair now, both in the shower and when I dry it.
I used to just blast high heat at my hair whilst running a big paddle brush through it. Can you imagine how many split ends that might have caused?
A gentler wash routine means that I let my hair soak in the goodness of both water and hair products.
I follow the general guidelines of co-washing and conditioning on the CG method, but again, I don’t spend more time in the shower than any normal person would.
Some followers of the method use the bowl method or several minutes cupping their hair upside down for curls to form.
I don’t do any of that anymore. I don’t have the patience and honestly, my hair can’t tell the difference.
Time to heal
Ultimately, the Curly Girl Method allows your hair to heal from years of abuse. The sulfate/silicone cycle has been broken and slowly as your hair grows, it’s natural texture will shine through.
I’ve seen countless women on social media whose hair has literally been transformed.
Check it Jitka’s transformation on Instagram:

Or Jessica’s Curly Girl transformation:

Isn’t it crazy to see how much their hair has changed? Now although I can’t promise you results like this, I can show you exactly what I did to get back ownership of my wavy hair.
The Ultimate Wavy Hair Routine For Type 2abc
First things first. If you truly have wavy hair, it will not go curly. You might discover you have curly hair down the line, if so, that’s awesome! But if you’re a genuine 2a you will not achieve 3a curls.
Now, you can absolutely manipulate your hair to look like it’s curly with the CGM method, but it won’t last.
It would require a lot of gel, a lot of time and towards the end of the day, your volume is gone and your curls will not survive the night.
I know because I did it. I could and still can achieve fantastic looking curls. And for a night out, sure, I’m game. But it’s not something I’m willing to spend 2 hours+ on every single day.
I’d rather spend 30 minutes and rock my natural waves.
So if you truly want to improve the health of your curls and encourage your waves to form naturally, this is the wavy hair routine for you.
While you’re here, check out this list of Curly Girl approved gels.
There are 4 steps to this 30 minute hair routine:
Step 1 – Co-wash
Step 2 – Condition
Step 3 – Apply Gel or Mousse
Step 4 – Dry
Step 5 – Break The Cast
What you will need:
- CG approved conditioner
- CG approved gel or mousse
- Old T-shirt or Microfibre towel
- Scalp brush (optional)
- Hairdryer and diffuser (optional)
I’ve listed more products further down below in this article, products that may suit your individual hair type. However, these products are my absolute personal favorites:
Co-wash
As I Am Coconut CoWash Cleansing Conditioner

Conditioner
Garnier Ultimate Blends Hair Food Banana

Gel
Eco Styler Olive Oil Styling Gel

Mousse
Pantene Pro-V Maximum Hold Mousse

I use this diffuser which I bought from Amazon and this type of microfibre towel. I personally also use a scalp brush as I struggle with build-up but that’s optional.
STEP 1 – CO-WASH – 5 minutes
The first step when following the Curly Girl method is co-washing. This essentially means that you will be washing your hair using conditioner only, no shampoo.
You can also use co-washing products which are gentle cleansers and these may work better for you if you struggle with build-up. It’s completely up to you.
The main thing is to not use shampoo that contains sulfate.
Instructions:
- Wet your hair as per usual. Make sure it’s soaking wet.
- Wash your hair with your chosen conditioner and really massage your scalp. This will get rid of build-up as well as stimulate blood flow to your scalp.
- Rinse your hair completely with water.
STEP 2 – CONDITION – 5 minutes
You can use the same conditioner you did for step one or choose a thicker consistency conditioner for this step. That’s what I tend to do, but it’s completely up to you.
Instructions for regular CG Method:
If you follow this method, it will take a little bit longer but you may also end up with tighter curls or waves.
- Use a palm sized amount of conditioner on soaking wet hair. You want to completely smother your hair in both product and water.
- Flip your hair upside down and begin to squish your waves up towards your scalp using your hands.
- Squish to condish. Just keep squishing…
- You should begin to see your waves/curls form into clumps.
If your clumps are frizzy, add more water and product. The goal here is to moisturize your hair as much as possible.
- With your hair flipped upside down, rinse your hair with water.
- Finally, add a bit more conditioner to your palms and repeat the squishing process but without too much conditioner.
Instructions for modified CG Method: Wavy Hair Routine
This is what I do now and the result is looser waves but that’s the look I’m going for.
- Use a palm-sized amount of conditioner and lean your head to the side and squish your curls from the bottom up. This reduces the amount of conditioner that reaches your scalp, resulting in less product build-up.
- After squishing your hair for 20 seconds, rinse out the conditioner.
- Completely soak your hair again, add a small amount of conditioner to your hands and squish again. Clumps of waves should begin to form.
You can choose to leave some of the conditioner in your hair, add more, or completely rinse. I like to leave a bit in as it helps my waves to form.
The reason I no longer flip my hair forwards and squish upside down is simply that it takes too long and I begin to feel uncomfortable.
I want my showering experience to be a good one, so by leaning my hair to the side and squishing that way, I still follow a wavy hair routine that will allow my curls to form.
STEP 3 – APPLY GEL OR MOUSSE – 5 minutes
Applying gel or mousse to wet clumps allows you to lock the moisture into the hair while the styling product forms a protective cast around each wave or curl.
I used to only use gel, but as I mentioned, I really struggled with the build-up on my scalp.
I now prefer mousse as it’s lighter BUT it can also be a bit more drying on my hair. You should experiment with both and see what suits you.
Instructions:
- Either apply mousse or gel to soaking wet hair, squishing upwards just like you did before. The wetter your hair is, the less frizz you should see.
- If you want tighter waves or curls, you’ll need more product than you think. Experiment but half a palm of gel or mousse is a good starting point.
- You should begin to see your waves form even more and once you’re happy with them, you’re basically done.
Now, I actually don’t apply gel or mousse to soaking wet hair anymore. It’s definitely better to do, but it takes my hair much longer to dry.
What I do now, is that I simply use mousse to squish my hair, but as I’m doing it, I squish out the water as well. Not all of it, but enough to know that I won’t be spending 2 hours drying it.
You have to weigh up the benefits of doing either in regards to your own situation. Using gel or mousse on soaking wet hair will definitely give you more defined waves or curls, but you can achieve a great wavy look even when squeezing out excess moisture.
And be careful about using styling products on your scalp. Try to only apply it to the hair strands, otherwise, you may experience build-up quite quickly.
STEP 4 – DRY – 15 minutes
Once you’ve applied mousse or gel you can either proceed straight to drying your hair using a diffuser or simply leave to air-dry. Air-drying works best if you’ve squeezed out most of the moisture, otherwise, the process can take a long time.
You can also ‘plop’ your hair, which is the term used for wrapping your hair in a microfibre towel or an old t-shirt. This is good to do if you want your hair to settle a bit whilst you’re putting on your clothes and make-up.
If you’re airdrying, there’s nothing much else to do but to wait for your waves to dry. The goal here is to not touch your hair at all. The more you mess with it, the more frizzy it will get.
Diffusing is a tool that you attach to your hairdryer and it essentially dries your hair through tiny holes which prevent a blast of air. This means heat is applied without ruining the clumps you formed in the previous step.
Instructions For Diffusing:
- Grab your hairdryer or diffuser and set the heat to medium.
- Flip your hair upside down and begin to dry the crown of your hair.
- Move the diffuser around your hair and you can even put the ends of your hair into the diffuser.
- Try to not ‘mess’ with your waves, simply let the diffuser dry the hair from the outside in.
- Once you get to 95% dry, let your hair dry naturally.
A cast should have formed around each wave or curl, and once 100% dry, you can then ‘break’ the cast.
Also Read: How To Spot Calcium Build Up in Hair (3 Ways To Fix It)
STEP 5 – BREAK THE CAST
You’ve now reached the best part! Breaking the cast. At this point, your hair may look a bit weird and crunchy but don’t worry, you’re about the reveal soft, bouncy waves!
Here’s what you might look like before you break the cast:

Instructions:
- Flip your hair upside down and use your fingers to ‘scrunch out the crunch’, also known as SOTC.
- Be careful to not comb your fingers through your hair. Be gentle and just try to soften up any gel or mousse that have hardened.
- The final step is to flip your hair back, tousle up your roots and you’re good to go!
You can apply a bit of mousse if you like, but that’s essentially my wavy hair routine!
What I’ve found, that with time, I hardly need to do any squishing in the shower.
I can wash my hair in 5 minutes, step out, squish as I apply the mousse and by the time I’ve gotten dressed, etc. my hair is almost dry. The cast has hardened, I break it and I’m good to go.
Once your hair returns to its natural state of health, your waves will form more naturally. For example in my case, I now have plenty of waves (even a few curls), without using product.
I honestly believe this is down to not straightening for such a long time as well as ditching the harmful ingredients.
Products For Wavy Hair
Now that you got the wavy hair routine down, let’s talk products.
It really doesn’t matter if you have straight, wavy, or curly hair as products are not designed that way.
Products contain different ingredients relating to moisture, protein, glycerin, etc. and you need to figure out exactly what your hair likes.
The best way to do this is to work out your hair porosity.
Hair Porosity
Porosity refers to how well your hair retains moisture.
Each of your hair strands has a layer of cuticles on the outside. These cuticles overlap each other, sort of like tiles on a roof. The more closely they’re positioned together, the less porous your hair is.
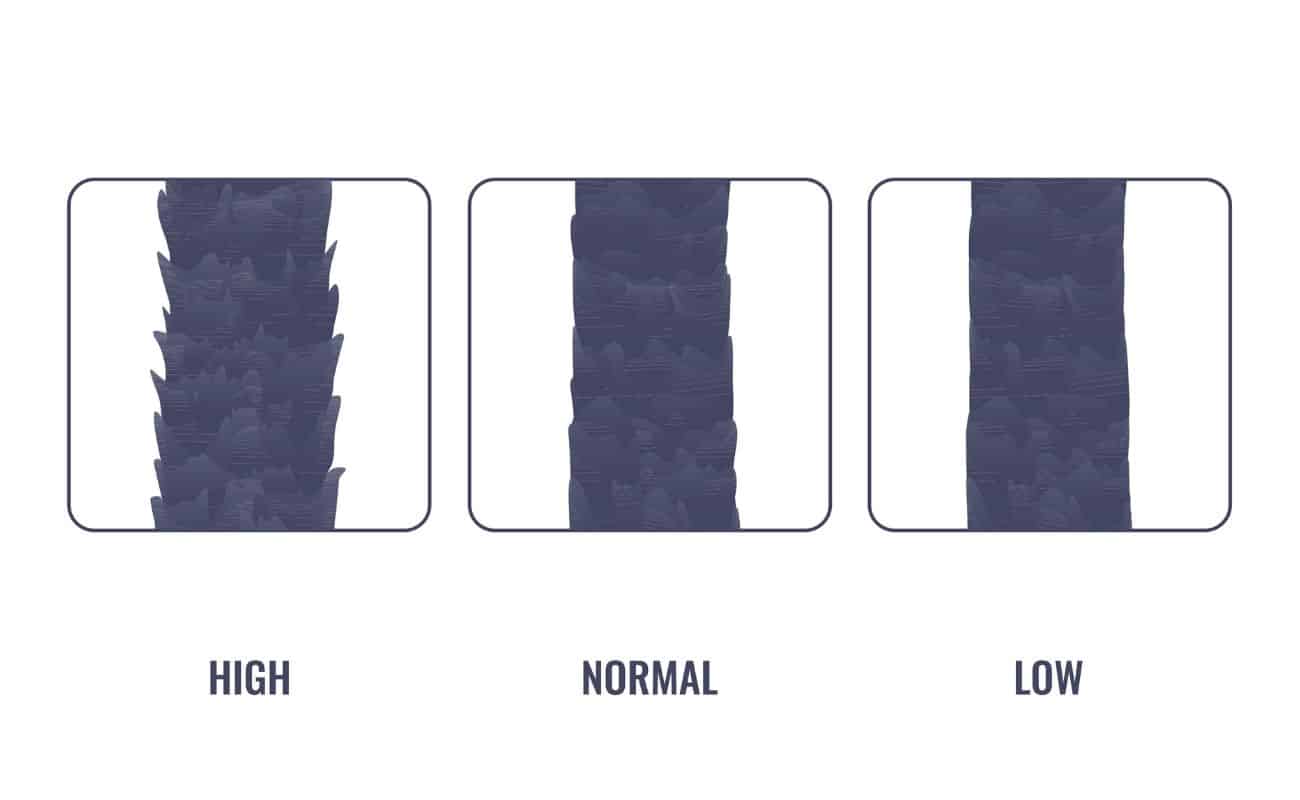
This simply means that water is not able to penetrate the cuticle as well as with someone who has high porosity hair. In this case, the cuticles do not overlap each other as tightly.
Low Porosity Hair
If you have low porosity hair, your hair is not very porous, meaning that moisture doesn’t penetrate that easily. This isn’t necessarily a bad thing but it means that you may want to do a deep conditioning treatment once a month to hydrate your hair. It could also be a sign that you’re suffering from protein overload.
Even better, use a deep conditioning heat cap to help your cuticles to open. A heat cap really helps the product to do its magic.
The characteristics of low porosity hair includes:
- Products like oil and creams sit on your hair rather than penetrating it
- Hair doesn’t easily get soaking wet
- It can take a while to dry
What you should look for in products for low porosity hair:
- Avoid oil-based or heavy creams
- Don’t use products that leave residue or white flakes
- Use water-based products
- Use honey or glycerin-based products as these can enter the hair shaft
It may also be a good idea to check if you in fact have too much protein in your hair.
Products for Wavy Low Porosity Hair
Earlier this year I wrote an ebook called The Ultimate Curly Girl Products Guide. In it, I reveal 112 CG products that were tried and tested by over 700 CG followers from 32 countries around the world.
The products are categorized based on hair porosity and curl pattern, and so the following recommendations are taken from this book and are specifically for those with low porosity hair:
Best For Co-washing
Conditioners
- Giovanni Tea Tree Triple Treat Conditioner
- Garnier Ultimate Blends Conditioner Almond Crush With Almond Milk & Agave Sap
Gels
Mousse
Medium Porosity Hair
If you have medium porosity hair, your hair is very balanced. This means that in theory, you don’t have to worry too much about moisture not penetrating, nor do you have to worry about moisture overload which can lead to hygral fatigue.
This doesn’t mean, however, that every product will suit you. In fact, it might be harder to find just the product for you.
The characteristics of medium porosity hair includes:
- Hair is able to absorb products easy
- It doesn’t take too long for your hair to become soaked
- Your hair is fairly easy to style
With medium porosity hair, you should try switching up hair products every once in a while.
Products for Medium Porosity Hair
Best for co-washing
- TRESemmé Botanique Conditioner Nourish and Replenish Coconut and Aloe Vera
- Curlsmith – Curl Quenching Conditioning Wash
Conditioner
Gela
Mousse
High Porosity Hair
If your hair is very porous, it means that it’s able to absorb moisture very easily.
Although this sounds great, it can often be a sign of damaged hair. This is due to the fact that chemicals and heat help to break down the protein in your hair, causing the cuticle wall to become broken.
And although moisture can easily penetrate, your hair is also not able to retain it well.
The characteristics of high porosity hair includes:
- Products are very easily absorbed into your hair
- Hair may feel dry and brittle
- It doesn’t take long for your hair to become wet or dry
What you should look for in products for high porosity hair:
- Products containing protein
- Use heavier products containing oil and butters
- Creams or leave-in conditioners that can help seal your hair
- Avoid further damage by using heat sprays
It may also be worth using cold or lukewarm water if your hair is particularly damaged. High porosity hair could also fall victim to a condition called hygral fatigue.
Hygral fatigue is when water is absorbed into your hair strands in such a way that they become swollen. As your hair dries, the strands deflate and this causes them to stretch and become thin.
This could cause your waves or curls to become limp and your hair would then easily break.
It’s not a condition that’s easy to reverse so if you do have high porosity hair, it’s important to take extra care of your locks.
Products for High Porosity Hair
Best for co-washing
Conditioner
Gels
Mousse
How To Sleep With Wavy Hair
Sleeping with waves or curls can be tricky if you don’t want to wash your hair every day. You’ll want to protect your hair from friction which can be caused by your regular cotton pillow.
Incorporate one of these into your wavy hair routine:
- A satin or silk sleep cap
- A satin or silk pillow case
- Hair buff
- Scrunchies
Satin Or Silk Sleep Cap
I’ve definitely found it useful to sleep with a satin silk cap and find that my waves are more intact the next day.
I use a super cheap satin cap that I bought from Amazon and it will keep your waves soft the next day.
The reason why this works so well is that it keeps in any moisture that you may lose if you don’t protect your waves at night.
Satin Or Silk Pillow Case
Another way to avoid frizz and friction is to buy a satin or silk pillow. These really work a treat and are better for those who don’t want to sleep with a bonnet during the night.
Whether you should choose satin or silk is up to you, but the benefits are mostly the same.
Hair Buff/Bandana
Another good shout is the hair buff or a hair bandana. This is a bit more robust and will keep your waves locked in during the night. You can buy the original ones which are a bit pricey, otherwise, I like these from Amazon. They do the trick just as well.
Scrunchies
Many curlies choose to sleep with their hair tied up loosely with a satin scrunchie. This is called a ‘pineapple’ hairdo, and essentially you just prevent your waves from lying loose which could cause them to go flat.
Refresh Routine For Wavy Hair
Although my wavy hair routine doesn’t take more than 30 minutes, you don’t want to wash your hair every single day.
If you’ve decided to invest in any of the sleeping accessories above, you should already be on your way to a quicker and easier morning hair routine.
If not, then follow these simple steps for a simple refresh routine for wavy hair:
Instructions:
- Flip your hair forwards and lightly spritz with water. You can use a spray bottle where you’ve added a bit of conditioner for additional moisture.
- Apply a good dollop of mousse to your hair and scrunch your waves up towards your scalp, just like you did when you were washing it.
- Flip your hair back and tousle your roots.
- If your hair feels too wet, you can diffuse or simply wait to air dry!
And that’s it. That is my 30 minute wavy hair routine for 2abc hair types!
I hope this guide has helped you realize that you do not need to invest 2 hours every time you want to achieve gorgeous, bouncy waves.
The Curly Girl Method is for everyone who wants to restore their hair’s natural health, and remember – you decide how you want to follow the method and exactly how much time you’re willing to invest!
Disclaimer: This site is not intended to provide professional or medical advice. All of the content on LovedByCurls.com is for informational purposes only. All advice should be followed at your own discretion. Ingredients may change at any time so always check the product label before using. Check our full disclaimer policy here.