Beginners of the Curly Girl Method – you’ve come to the right place!
The popularity of The Curly Girl Method has been on a steady rise in recent years and no wonder.
The method works!

This post contains affiliate links and we may earn if you click on them (at no extra cost to you). Please read our full disclosure policy here.
I’m sure you’ve seen the before and after photos of incredible transformations and now it’s time for you to get started.
The method can seem complicated at first, but if you start with the basics, it’s super easy.
This Curly Girl Method for Beginners Guide has been created with simplicity in mind but promises maximum effects!
Beginners starting their Curly Girl Method journey should be aware of two things: Number one, you do not have to spend a lot of money on hair products and number two, be patient!
I cannot stress this enough. You will not see results overnight but if you stick with it, even through the Curly Girl transition phase, you’ll start to see the true potential of your curls.
Here are my own before and after photos:

Just Looking For Products To Use?
If you’re already familiar with the method and just looking for advice on products, I’d suggest you figure out your hair porosity first and then skip to the recommended product section.
What is the Curly Girl Method (For Beginners)
Beginners of the Curly Girl Method might know that the method was created by Lorraine Massey. She is the author of the best-selling book Curly Girl Handbook.
Also known as CG or CGM, the Curly Girl Method encourages you to ditch products containing harmful chemicals as well as heat appliances like straighteners.
The results? Healthy, shiny, bouncy curls!
Here are the basic rules:
❌ No sulphates, silicones and drying alcohols
❌ No heat styling
❌ No brushing
❌ No towels
You can very easily find products that are Curly Girl approved. Simply check out my post on recommended approved CG products or go to curlsbot.com or curlscan.com if you are ever in doubt about a specific product.
Let’s very quickly explain the rules so that you can understand why the above items are not recommended.
Ingredients To Avoid On The Curly Girl Method
Sulfates, Silicones, And Drying Alcohols
These ingredients can be harmful for your hair and scalp and should be avoided even if you’re not following the Curly Girl Method.
Sulfate is a harsh cleanser that causes shampoo to foam up. This is also known as ‘lather’. Although it does clean your scalp, it also strips your hair of moisture and essential natural oils.
Have you ever noticed how your hair feels dry and tangled after using shampoo? This is caused by sulfates.
The Curly Girl Method, therefore, recommends that you do not use shampoo. However, you should know that there are CG-friendly cleansers out there that are absolutely safe to use. More on this later.
Unlike sulfates, silicone helps smooth your hair and makes it soft again. I’m sure you’ve noticed this when using conditioner.
The problem with silicone is that it acts like wax. Wax coats the hair strands (making it feel soft) but is often not water-soluble.
This means that the only chemical which can rid your hair of silicone is, well you guessed it, sulfates.
Using sulfates and silicone products is, therefore, a never-ending circle that the Curly Girl Method encourages you to break.
And finally, some drying alcohols in hair products can be well, very drying, and can cause split ends. The CG method, therefore, recommends you avoid these completely.
The fact that the Curly Girl Method is so gentle on your scalp and your hair makes it perfect for your little ones if they have waves or curls. If interested, read my Curly Girl Guide For Kids. It’s a modified version that’s easy to follow and fun for your children.
Things To Avoid On The Curly Girl Method For Beginners
Heat Styling
This means straighteners, curlers, and using a hairdryer on high heat.
Heat is very damaging to our hair and causes it to lose its structural integrity.
If your hair has suffered damage, you will often need a protein treatment or a moisturizing treatment to rebuild hair back to its health.
Brushing
Brushing your curls messes with their natural texture and you should therefore avoid this if following the Curly Girl Method.
Brushing can easily lead to breakage, especially if used on dry hair.
The only kind of brush that we recommend on the CG method is a wide-tooth comb and only when used on wet hair.
Regular Towels
Regular towels can cause friction between hair strands and could lead to split ends. The CG method, therefore, recommends that you use a microfiber towel or an old t-shirt to wrap your hair in when wet.
Best Way To Start The Curly Girl Method For Beginners
One of the key mistakes I see when beginners start the Curly Girl Method, is that they don’t really know much about their own hair.
What kind of curl pattern do you have? Does your hair like moisture? Do you lack protein? Has it been damaged from using chemicals or heat?
The answers to these questions could help you find the products you need much quicker, but ultimately there are two things you really need to know:
- Your hair porosity
- Your curl pattern
Many Curly Girls believe that they should buy products based on their curl pattern, but that’s actually not correct.
The structural integrity of your hair is far more important and can be determined via its porosity.
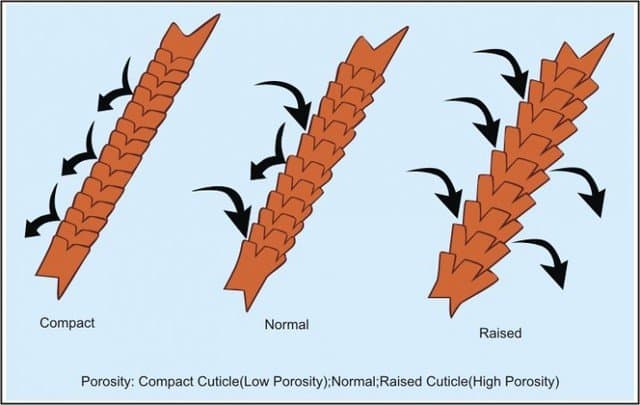
Question 1: What Is Your Hair Porosity?
Hair porosity refers to your hair’s ability to retain moisture.
The majority of your hair is made up of protein with the outermost layer called the cuticle.
Your hair porosity is determined by the condition of this cuticle layer.
If the cuticle layer is open or raised, it’s much easier for moisture to penetrate the hair shaft. This is called high porosity meaning your hair is very porous.
If the cuticle layer is compact and tightly closed, your hair is low porosity.
If it’s somewhere in the middle, you have medium porosity hair.
There are three ways you can determine your hair porosity. I like to test out all three to make absolutely sure.
The Porosity Tests
The Feel Test
Grab one of your hair strands and place it between two fingers.
Slide your fingers all the way up the shaft and follow the hair strand to the root. How does the hair feel? Smooth or rough?
If it feels smooth, it’s likely that your hair is low porosity as the cuticle aren’t raised. If it feels rough, you will have normal to high porosity hair.
The Wet Test
Use common sense. Wet your hair under the shower and assess how well your hair absorbs moisture.
Does it feel like your hair is soaking wet straightaway? Or does it take a while?
Do you always feel like hair products don’t really penetrate your hair? If so, you will have low porosity hair that doesn’t absorb moisture well.
If your hair seems very wet and loves products, you have high porosity hair.
Also Read: The Rezo Cut Ultimate Guide (Must See Transformations)
The Strand Test
You simply take a strand of hair and put it in a glass of water.
If the hair sinks to the bottom, your hair absorbs moisture easily and you have high porosity hair.
If your hair floats, you have low porosity hair.
Do be careful with this method as oils or residue from products can affect the outcome of the test and make your hair float even if you have high porosity hair.
Make sure your hair is clean and free from any products before taking this test. The best thing to do is to try all three methods and determine your hair porosity from this.
Once you’ve got your hair porosity figured out, move on to the next question.
Question 2: What’s Your Curl Pattern?
Wavy, curly, coily and kinky?
Curly Girls have many names and I’m sure you have a vague idea of which is yours.
The best thing about the Curly Girl Method is that it’s for anyone and everyone who has a bit of texture in their hair.
This is because the CG Method encourages your natural hair to flow and form as it was meant to. Beginners to the method might even find that following the Curly Girl Method actually produces even curlier locks than you thought you might have!
You can also check out my other guides – Curly Girl guide for straight hair and Curly Girl Guide for fine, wavy hair.
For determining your curl type, we’re going to use the Andre Walker curl type system.
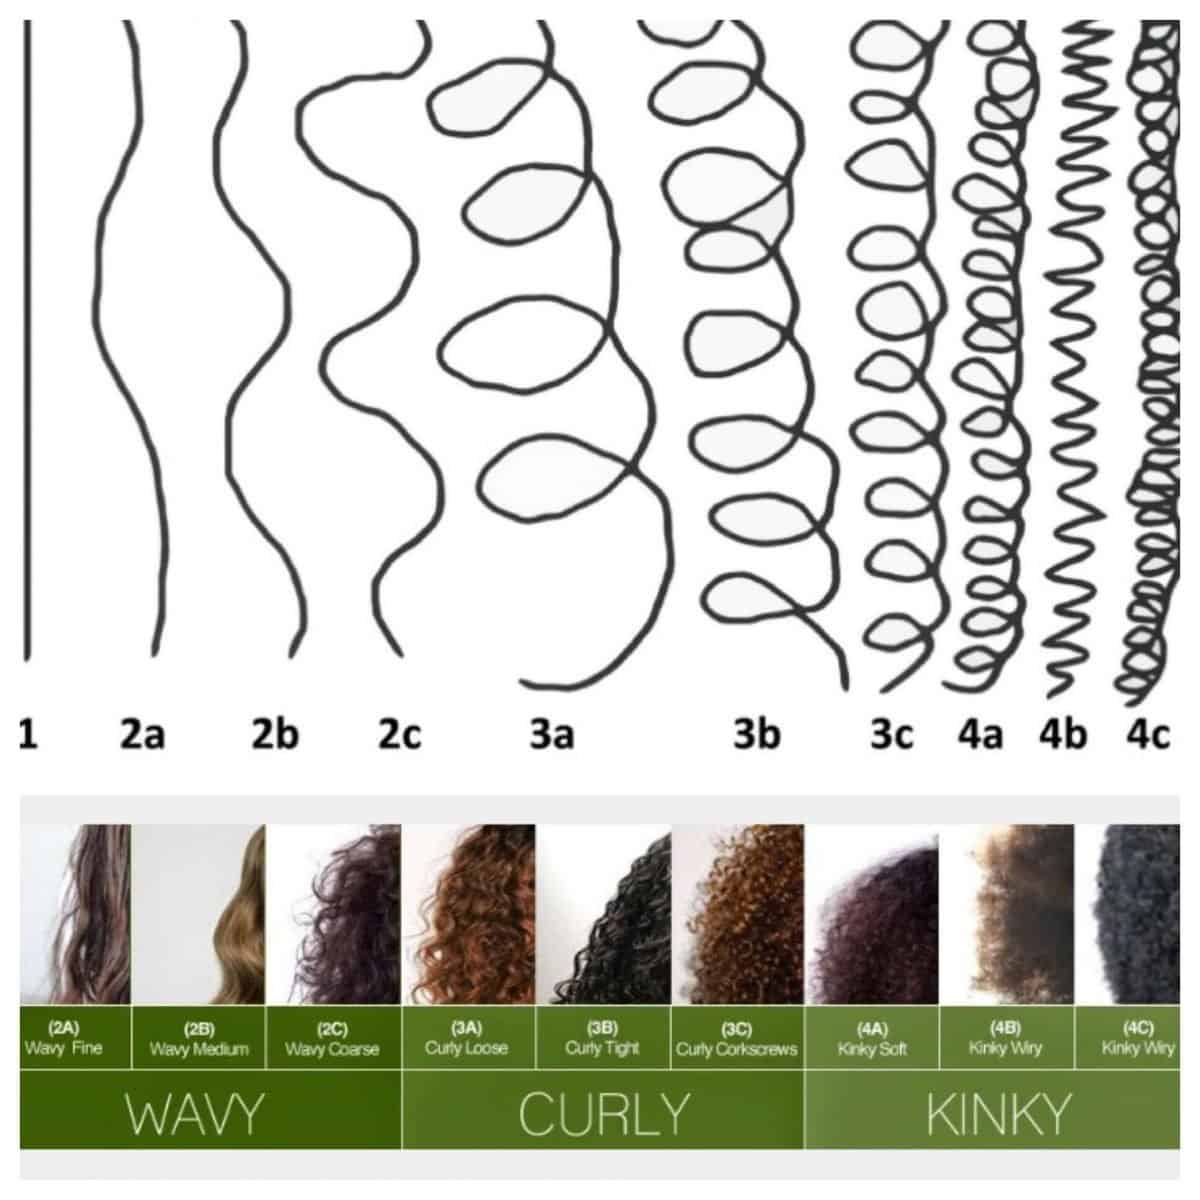
The Curl System
The Andre Walker system follows a numerical order of 1,2,3,4 and is then prefixed by A-B-C or D.
If you have straight hair, your curl type is either 1A, 1B, 1C and if you have wavy hair your curl type is either 2A, 2B, 2C. Type 3 (ABC) is generally classed as curly and type 4(ABC) is classed as kinky.
Your hair type won’t matter for the products that you’re using but knowing and understanding your curl type can help guide you towards finding the optimal routine for your hair.
Please do note that your hair porosity, as well as curl type, can change over time.
That’s why hair sometimes gets damaged or dry or even over-moisturized.
A change in hair porosity can be caused by chemically treating your hair (color or straightened).
A change in curl type can happen if you over-condition your hair or use products with ingredients that don’t suit your level of porosity.
Now that you have the answers to both questions, let’s move on.
Also Read: The BEST Apple Cider Vinegar Rinse For Curly Hair
Curly Girl Product Suggestions For Beginners
Before we start the guide, these are the products I would recommend beginners of the Curly Girl Method to use based on their hair porosity type:
Low Porosity
CONDITIONERS
[wptb id=5253]
GELS
[wptb id=5256]
Medium Porosity
CONDITIONERS
[wptb id=5259]
GELS
[wptb id=5260]
High Porosity
CONDITIONERS
[wptb id=5262]
GELS
[wptb id=5263]
These are only recommendations and are not guaranteed to give you results. We are all different and everyone’s hair reacts differently to products.
These are the tools I’d recommend for beginners of the Curly Girl Method:
[wptb id=5243]
[wptb id=5245]
[wptb id=5247]
[wptb id=5246]
It’s not absolutely necessary to have these things, but it does make following the method easier.
Alternatively, you can use an old t-shirt instead of the microfiber towel and you can airdry your hair.
I would also thoroughly recommend that you bring your conditioner, gel, scalp brush and microfiber towel with you into the shower.
You’re going to need all items while you’re there.
Curly Girl Method for Beginners – Easy 4 Step Guide
This Curly Girl Method Beginners Guide contains 4 essential steps:
Each step is described in detail with explanations of Curly Girl terminology you need to learn.
The guide assumes that you have already purchased your products (see above), so I won’t be recommending any further products within the guide.
Let’s dive in!
Step 1 WASH
One of the fundamental rules of the Curly Girl Method is to not use shampoo. Instead, you should aim to co-wash only.
Co-washing means conditioner washing and so you should aim to only wash your hair with CG approved conditioners.
Note that you don’t need to do a so-called ‘final wash’. This is the term used for using sulfate shampoos one last time. It’s simply not necessary.
As explained earlier, most shampoos contain sulfates but you can get some shampoos that are no-poo or low-poo.
No poo means that there is absolutely no lather in the product and low-poo means there is some.
In low-poo shampoos, the sulfates have been replaced with other chemicals to make the product lather and cleanse your hair.
Some argue that these ingredients are equally as harmful as sulfates and therefore low-poo shampoo is not recommended.
However, it’s important to note that the choice is completely yours. At the end of the day, it’s just hair!
The Co-washing Routine
You should follow a routine that suits you and if it turns out that co-washing simply doesn’t clean your hair properly, then you wouldn’t be the first to use a clarifying shampoo every now and then.
In fact, many Curly Girls follow a so-called modified version of the Curly Girl Method and this could be recommended for beginners as well.
People who suffer from dermatitis, scalp conditions, disabilities or have demanding jobs may choose to shampoo once every week or once every four weeks.
You can still improve the health of your curls significantly even if you don’t want to follow the CG method 100%.
I wrote a list of Curly Girl friendly shampoos if you do decide that this is the route you’ll want to take. These shampoos are all free from sulfates and silicones.
Now, a co-washing routine consists of two steps – cleansing and conditioning.
You can use the same conditioner for cleansing as well as conditioning.
Most use two different products as using the same product consistently can make it ineffective.
How To Co-wash
- Wet your hair and ensure it is soaking wet
- Add a palm-sized amount of conditioner to your hair
- Massage scalp vigorously and apply the product all over
- Rinse off
Condition
- Flip your hair forwards so that your curls are hanging in front of your face
- Apply conditioner to your hair.
- Ensure your hair is soaking wet and drenched in conditioner
- Gently cup the mixture and ‘scrunch’ your curls up towards your scalp
- As curls form, try to form big clumps of curls until you’re satisfied
Helpful tips
- When co-washing, it’s very important to clean your scalp from product build-up and grease.
- Invest in a scalp brush to help you achieve the best results. It’s really worth the investment and they don’t cost a lot.
- The most important thing when washing is to keep curls hydrated. This is what will give you a frizz-free result. The more you ‘cup’ and scrunch the curls up towards your scalp, the bigger clumps you’ll get.
- If your curls look stringy, add more water.
- Water and conditioner should be added continuously to achieve the best results. Add more conditioner if your curls are not forming.
Also Read: Benefits of Sleeping in a Silk Cap
Step 2 Wet Style
You should now be in a state of bending forwards with your curls in front of your face. Your hair should be dripping wet and curls formed via the scrunching of water and product up towards your scalp.
It’s now time to style your curls.
INSTRUCTIONS
- Scrunch your curls towards your scalp a tiny bit to remove some of the water
- Grab a large dollop of your CG approved gel and scrunch again. The idea here is to ‘seal’ the curls with the gel
- Use as much gel as needed (a handful would work) and scrunch your curls tightly
- Once you’re done, grab your microfiber towel and wrap around your hair
- Stand up straight, wipe off the sweat from your forehead and get dressed.
Congratulations, you’ve just completed step 2.
Before you dry your curls, you can choose to keep your curls locked away within the microfiber towel for anything up to 30 minutes.
This is called ‘plopping’ and many Curly Girls argue that it gives them much less frizz.
It allows for your curls to sit for a bit and for water to evaporate.
I personally do it so I can get dressed and do my face but it’s not necessary to plop.
Helpful Tips ?
- Beginners of the Curly Girl Method may find it counter-productive to apply gel onto wet hair. Surely the product wipes off? Not true. Although some of the product may transfer to your hands or the towel, much of the gel very quickly forms a sealant around each curl, keeping it intact and smooth.
- You can squeeze out as much water as you like from your curls to minimize the drying time.
- Hydration really is the key to bouncy, frizz-free curls so if you can manage to keep your hair fairly wet, you’ll have better results
- You will need more gel than you think to begin with. I would recommend a handful to get a great cast.
- If your hair looks stringy and frizzy, it’s most likely because your hair needs more water and conditioner mix before you apply gel
Step 3 Dry
You’ve applied your gel, you’ve wrapped your hair and you’re now ready to dry your hair.
You have two options: Air dry or diffuse.
If you choose to air dry, expect to wait a few hours before your gel cast has hardened.
If you’re washing your hair during the weekend it may not be a big issue but if you like to do it in the morning before work, it’s probably not the best option.
Airdrying can produce a less frizzy results as your curls are not being tampered with at all, however you may not also get the volume you desire.
Whichever way you choose to dry your curls is completely up to you.
Diffusing is something most Curly Girls swear by.
A diffuser is a hairdryer attachment with lots of little holes for the air to get through.
This means that air won’t blow directly onto your hair which can cause a lot of frizz. In return, it also means that your hair won’t dry as fast.
My favorite diffuser (and budget-friendly) is this one from Amazon.
It is also not recommended to use high heat when drying as this could damage your hair.
Also Read: How To Pre-Poo For Low Porosity Hair: Easy Guide
INSTRUCTIONS FOR DIFFUSING
- Attach your diffuser to your hairdryer
- Focus on your crown first. Hover the diffuser over the top of your hair
- Move on to other parts of your hair without touching any of your curls
- As your curls begin to dry, you can start to cup them with the diffuser
- Flip your hair from one side to the other to produce maximum volume
- Diffuse until 90% dry
- Let sit for 10 minutes before breaking the cast
Helpful Tips ?
- Diffuse in the opposite direction of your natural parting. This will give you a much better volume.
- Experiment with heat settings. Some like to use medium heat for the crown and continue with cold air. You will absolutely get the best results with cold air but it will also take twice as long. You need to find the right balance for you.
Check out Kristyn Joanne’s video on how to diffuse on the Curly Girl Method.
Step 4 Break The Cast
You’ve waited hours or finishing diffusing and it is now time to unleash your beautiful curly locks.
For beginners of the Curly Girl Method I can reveal that this step is by far the most satisfying part. Breaking the cast!
Breaking the cast means to scrunch out the crunch (SOTC) and revealing the soft curls hidden inside the gel cast you’ve created.
Instructions
- Ensure your curls are 100% dry before breaking the cast. If not, you’ll experience a lot of frizz
- Gently begin to crunch each curl with your hands. You can also use a t-shirt or microfiber towel
- Be careful not to disrupt the curls too much
- Flip your hair forward and tussle your roots for additional volume
- Make sure you scrunch out all the gel cast and admire your soft, silky smooth curls
Now, for full disclosure, some Curly Girl’s don’t actually get a cast. This can be by choice or it could be that you need to work on your technique.
In general, the more gel you use, the easier it will be to get a cast but your hair may also feel heavier and become greasier more quickly.
It’s a fine art to achieve just the right cast with the right amount of gel and the only thing you can do is try different routines.
But there you have it. That is essentially the Curly Girl Method for beginners!
It is my recommendation that you really try to nail the method rather than testing out ten different products in your first month
You can also use mousse instead of gel if you prefer. The hold and cast won’t be as strong but your hair may feel softer. It’s completely up to you.
Additional Steps
Once you get a hang of the basics, you can have a go at these other steps which will help you build a sustainable Curly Girl routine.
Clarify
As mentioned in the beginning, for some Curly Girls, co-washing is not going to cut it. If you want to use a clarifying shampoo then that’s completely OK.
I would recommend you try co-washing only at first and if you feel that your hair is only getting greasier or your scalp is becoming itchy, then it’s time to clarify.
You can try a natural clarifier such as an apple cider vinegar rinse.
Simply mix 100 ml of apple cider vinegar with 300 ml of water and add to soaking wet hair.
Use a scalp brush to really massage your scalp and get rid of all that build-up.
Then follow up with conditioner as per usual.
If you don’t want to use apple cider vinegar, try one of these Curly Girl friendly clarifying cleansers:
[wptb id=5268]
It should not be necessary to clarify more than once a week.
Deep Condition
One of the best things you can do for your hair is to treat it with a CG friendly deep conditioner once a week.
However, it’s important to know if you need a moisturizing treatment or if you could benefit from CG approved protein products as too much of one or the other could cause your curls to lose their shine and vigor.
I’d strongly recommend you read my post on protein vs deep conditioning treatments to figure out which deep conditioner you should be using.
Refresh
One of the benefits of following the Curly Girl Method is that you won’t need to wash your hair as regularly as before.
This is because your scalp won’t overproduce oils that normally get stripped by sulphates.
Instead, you should try refreshing your second and third-day curls. You can do this with a bit of water or conditioner and some even just add a bit of gel to their hair.
Read my post on various ways of refreshing curls and find out which method would work best for you.
It can also be a bit of a struggle figuring out how to sleep with your curls without ruining them, so sleeping in a silk cap could make all the difference.
Remember, the Curly Girl Method can be as easy or as difficult as you choose to make it.
The most important thing is to focus on using natural products without harmful ingredients and you’ve already done most of the work.
Remember hydration is key to frizz-free curls and that if you want to use shampoo, then use shampoo!
Maintaining your curls shouldn’t be another task you just have to endure. You should want to enjoy it!
Disclaimer: This site is not intended to provide professional or medical advice. All of the content on LovedByCurls.com is for informational purposes only. All advice should be followed at your own discretion. Ingredients may change at any time so always check the product label before using. Check our full disclaimer policy here.